Rollback Hit Validation
TIP
This page assumes you know how to setup attacks and abilities.
WARNING
This system is still under development, but is tested and active on our own dinosaurs. Please report any issues you encounter with it.
As part of an initiative to combat cheating, we have released a new hit validation system for dinosaur attacks. This system allows servers to perform some more accurate verification for attacks by “rolling back” the attacker and target in time to where they were at the time the attack happened.
This new validation method is opt-in and requires some setup from mod developers to use in their own, custom dinosaur abilities.
We heavily recommend using it if your abilities are a match for its requirements listed below.
When should I enable this new validation system.
DANGER
Failure to follow these requirements may cause attacks to be rejected by the server. This will impact the quality of gameplay players will have, be careful!
Currently, this system can only be used under the following conditions:
- The ability is a melee attack, and uses the dinosaur's body parts to deal damage.
- Damage is dealt through animation notifies.
- The
Do Damageanimation notify class is required.
- The
- The
Deal Damage on Hit Wallflag is disabled. - The animation sequences used by the ability are not additive.
Additionally, we heavily recommend that the following conditions are followed:
- The ability does not move the player too much.
- While the system may still work, it increases the risk of valid hits being rejected by the server.
For example, a bite or claw attack ability is excellent for this system, whereas a lunge or spit (AOE) attack is not.
TIP
We plan to add support for other types of abilities in the future, such as Area-of-Effect attacks or lunges. Stay tuned!
How do I enable this system on my abilities?
Enabling the system requires some setup on the ability and its animation montages used for the attack.
Step 1: Setting the preview mesh of the montages.
In order to generate data about the attack, the system needs a preview mesh to be setup in every montage used by the ability.
TIP
This only needs to be done on montages that deal damage.
Open the montage you wish to setup, and click on the Preview Scene Settings tab, which is in the top right corner of the window, next to Details.
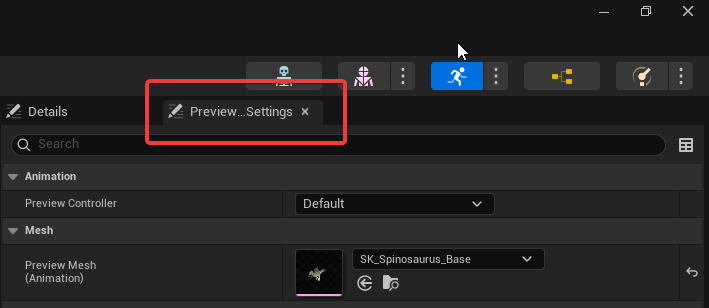
Select the correct preview mesh for the ability. It should match the skeletal mesh used by your dinosaur. Then, press the Apply to Asset button.
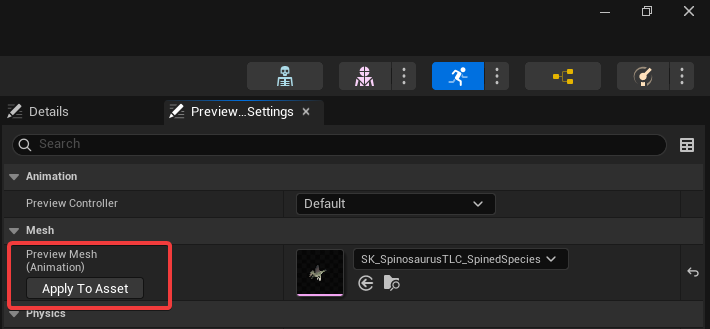
Finally, save the animation montage. Repeat these steps for every montage that deals damage in your ability.
Step 2: Enabling the system on your ability.
Once you've setup the montages, you can enable the system on your ability.
To do so, open your attack ability, and head down to Behaviour > Validation. Then, enable Requires Close Proximity and Use Advanced Proximity Validation.

Step 3: Generating the data required by the system.
Once the system is enabled for your ability, it will automatically generate the necessary data while saving the asset. Simply hit Compile and then Save.
To determine if it worked, you may check if some new data appeared under Weapon Trace > Attack Bounding Boxes and Weapon Trace > Attack Montages.
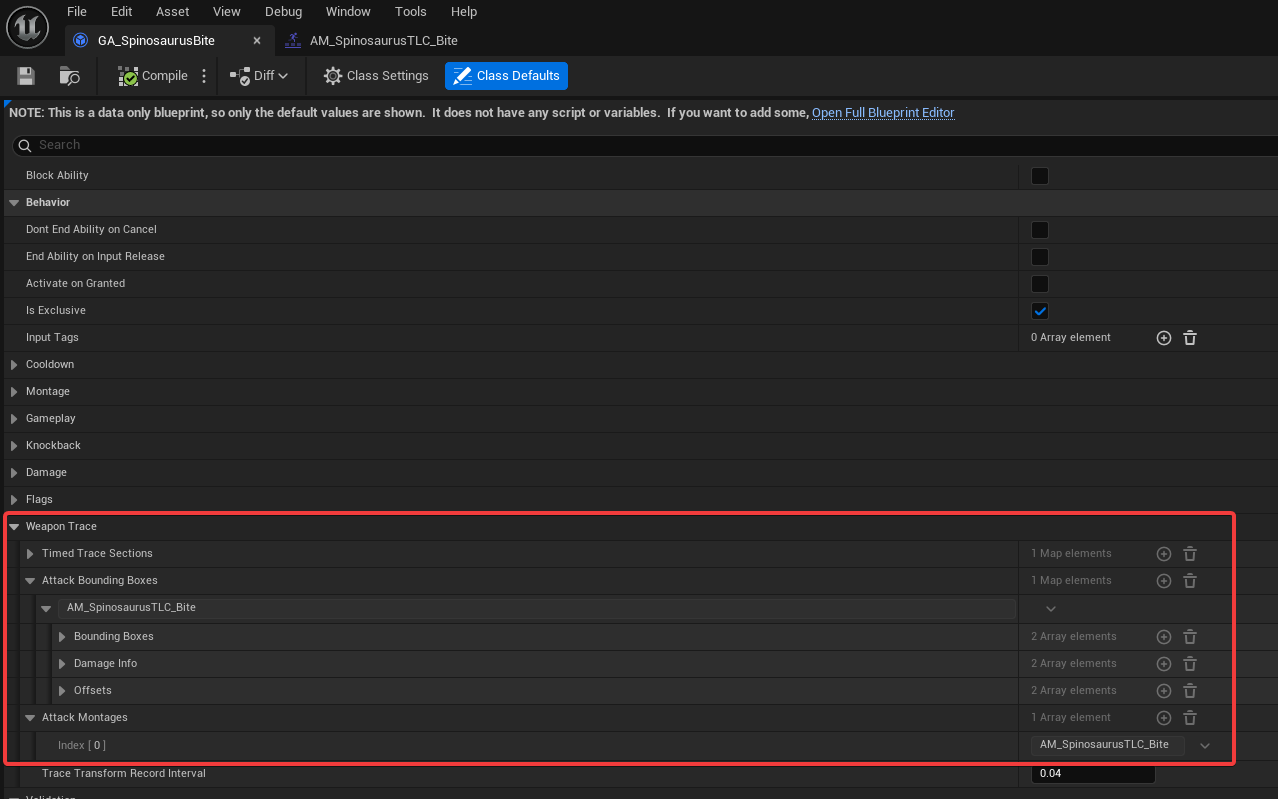
You should see the name of your attack animation montages under Attack Montages. It should have as many elements as there are montages that deal damage in your ability.
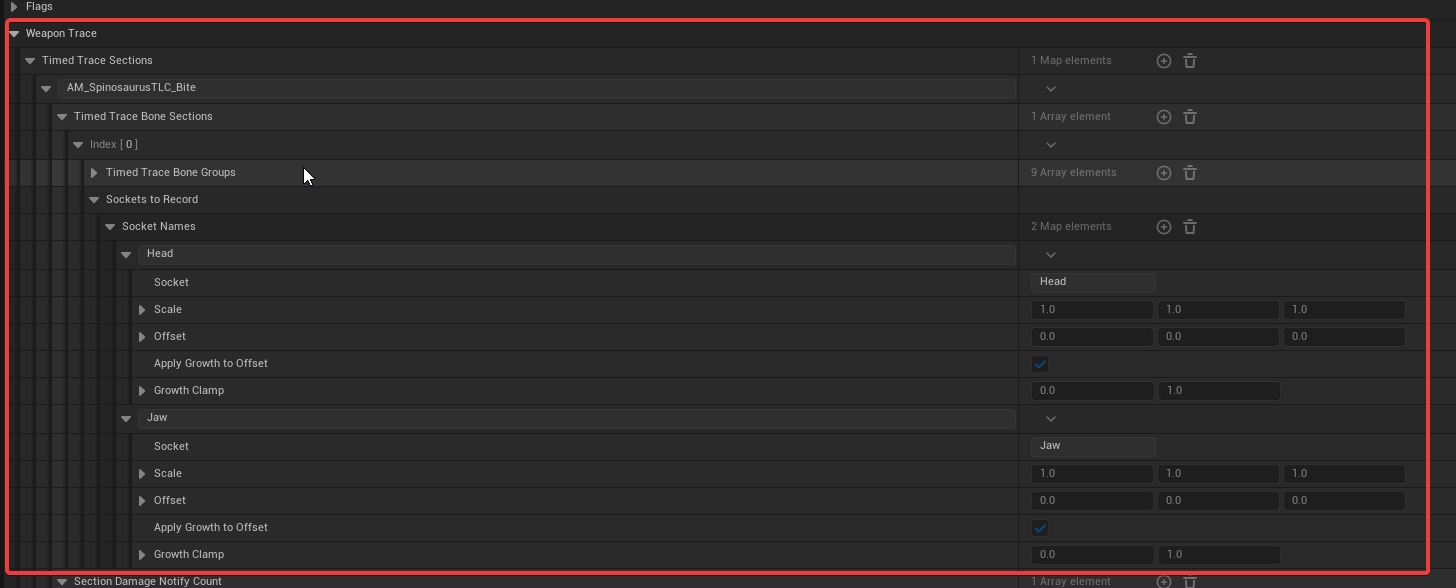
Additionally, the number of bounding boxes per animation should match the amount of bone socket names used by your attack:
WARNING
In the event that these do not match, or some are missing, please check the Output Log for errors. They will explain what went wrong.
Congratulations, you have enabled the system on your attack.
Testing your attack after enabling rollback hit validation.
You will want to test the system after enabling it on your ability, to ensure it still works and won't cause issues for players.
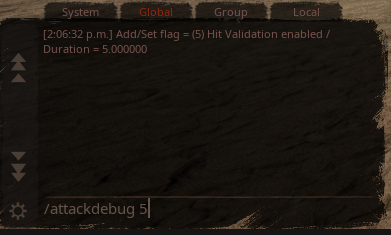
Debugging using /attackdebug
First, make sure your Net Mode is set to Play as Client, and set the Number of Players value to 2.
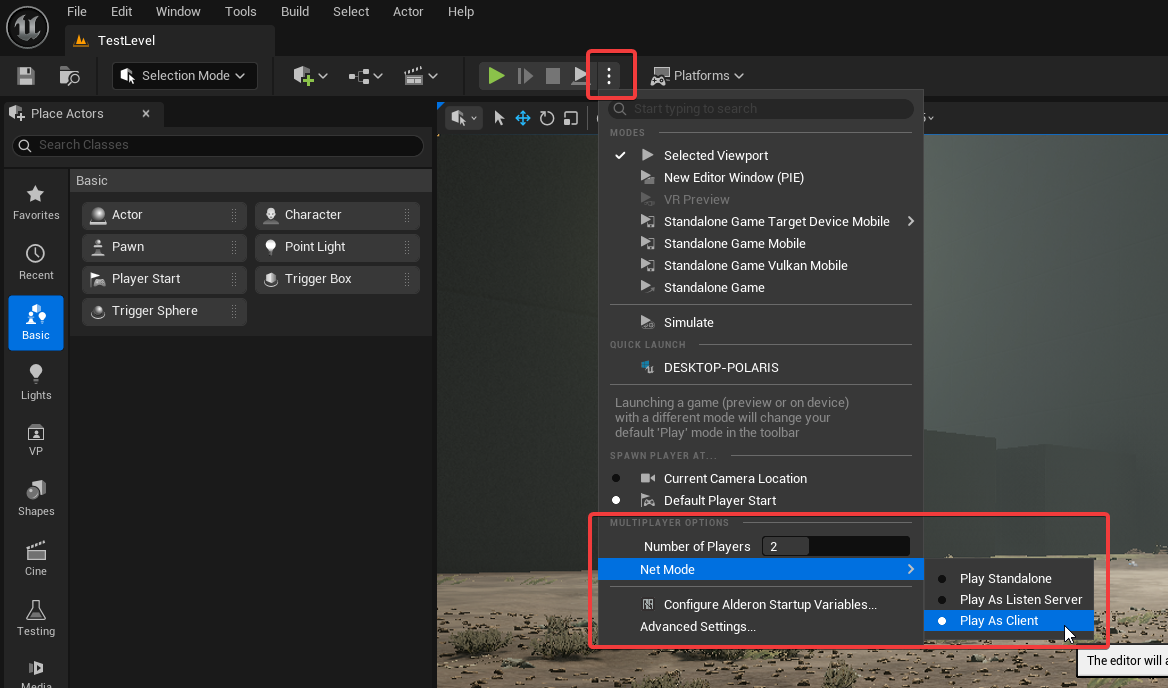
Then, start a PIE (Play-in-Editor) session. Make sure one of the dinosaurs is the one with the ability you want to test. Once you are in-game with two characters, you can use our attack debug command with the new validation mode (/attackdebug 5).
TIP
This debug display will not show data if you attack using an ability that does not use rollback hit validation. It will also not display anything if the attacker doesn't hit a target.
This will provide some data when you attack another dinosaur using an ability that uses rollback hit validation.
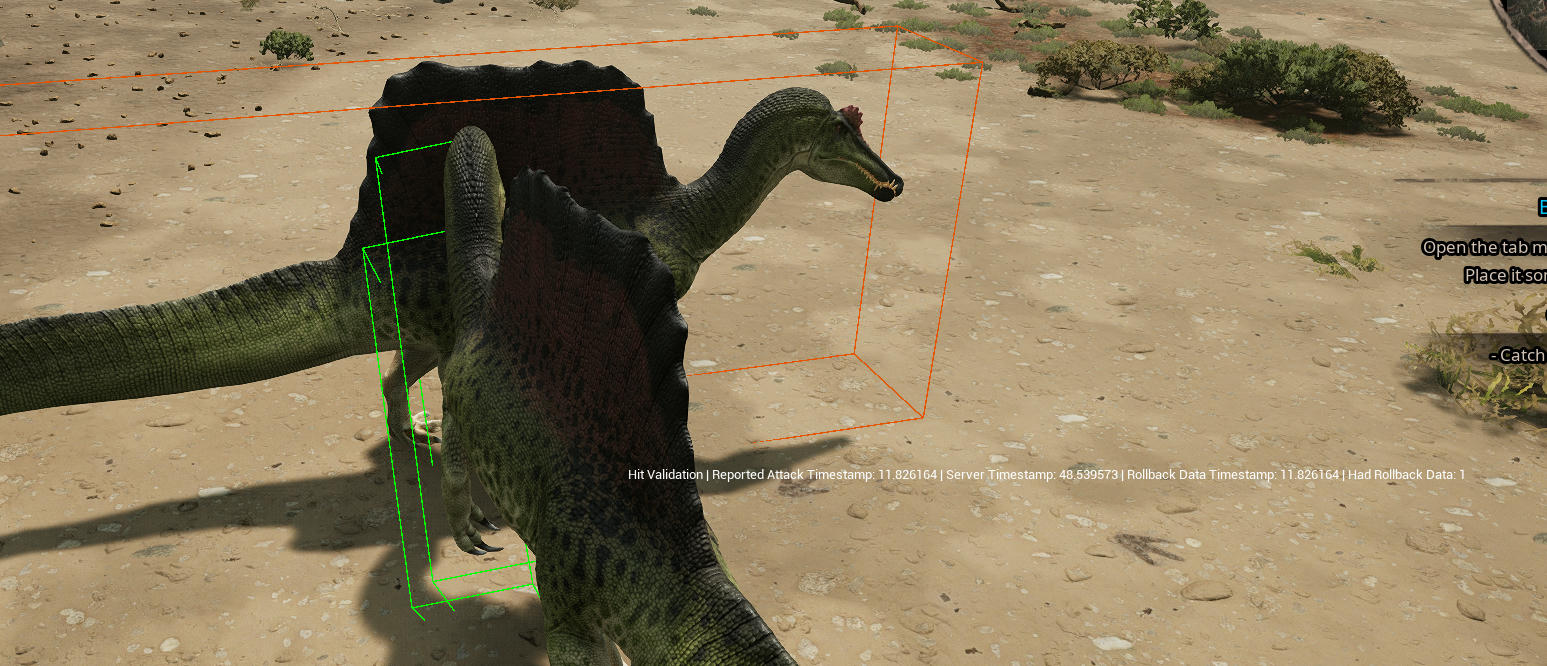
Here's an explanation of the debug data being displayed:
| Type | Description |
|---|---|
| Orange Box | The bounding box of the target dinosaur. This is what the attack needs to hit to pass validation on the server. |
| Green Boxes | The bounding boxes of the attack. They are an approximation of the area an attack can hit. They are green when the server validates the attack. |
| Red Boxes | Same as the above, but boxes can be red if the server rejected the validation for them. |
| Yellow Sphere | The position the attacker reported to the server when they attacked. |
| Blue Sphere | The position the attacker had on the server when they attacked. |
| Orange Sphere | A correction of the attack position, which may appear if the server disagrees with the attacker's reported position. |
| Purple Sphere | The position the server thinks the attacker had when they attacked. This only appears if the server rolls back the position to help validation be more accurate. |
TIP
It is acceptable to have both red boxes and green boxes appear. This means only certain bones of the attacker hit the target.
We also recommend using the /attackdebug 1 command, to make sure the attack's bounding boxes match the attack's range as closely as possible. Doing so will reduce the risk of the server rejecting otherwise valid attacks.
Here's an example of a well setup attack:
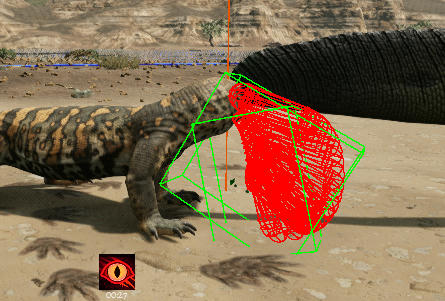
As you can see, the red hit traces are well within the green bounding box.
Advanced debugging with simulated latency
If the system seems to be working correctly with your ability, we also recommend testing it with some simulated network latency. This will allow you to get results closer to what players would see on a server, with varying levels of latency and packet loss.
To enable network latency emulation, go to Edit > Editor Preferences.
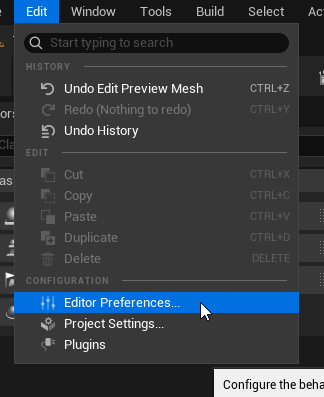
Search for Network Emulation.

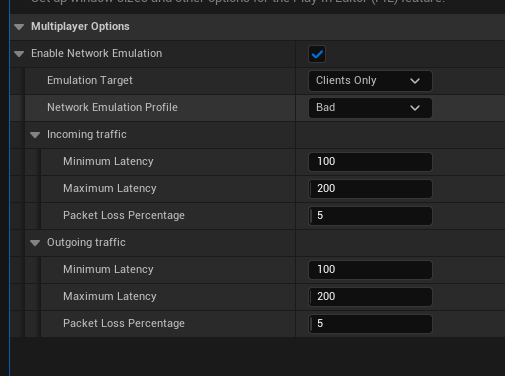
Turn on the Enable Network Emulation flag, and make sure your Emulation Target is set to Clients Only.
TIP
We recommend testing with a Network Emulation Profile set to Average or Bad. Feel free to test using both!
WARNING
Do remember to disable network emulation when you're done testing. It does not reset itself when the editor closes.
Summary
By following this tutorial, you have completed the following:
- Setup an ability to use rollback hit validation.
- Learned how to test and debug it before releasing it to the public.