Enabling Swimming and Flying
Enabling swimming and flying on your creature is a multi-step process. This guide will walk you through the steps needed to enable swimming and flying on your creature.
Step 1 - Editing The Creature's Blueprint
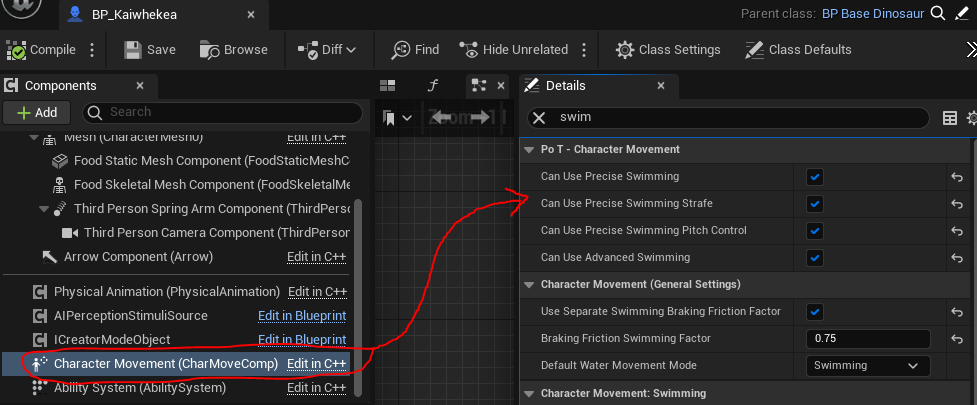
To use advanced swimming (diving and underwater movement) and flying, you must enable the settings below. You can have both swimming and flying enabled on the same creature (similar to Thalassodromeus).
To fully enable Swimming, ensure your creature's blueprint has the following enabled:
- Can Use Precise Swimming
- Can Use Precise Swimming Strafe
- Can Use Precise Swimming Pitch Control
- Can Use Advanced Swimming
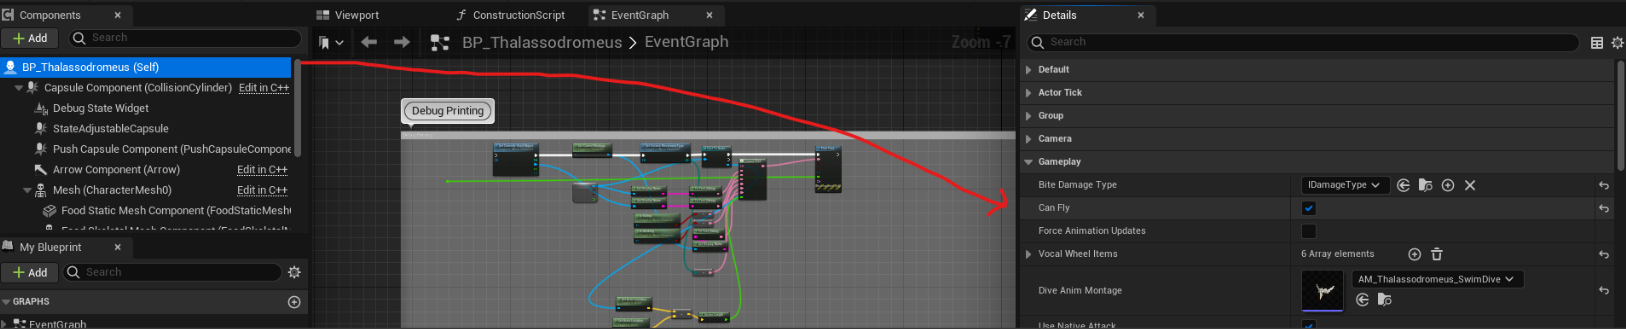
To fully enable Flying, ensure your creature's blueprint has the following enabled:
- Can Fly
- Use Smooth Flying Movement
You can tweak the settings in the Creatures Blueprint to alter the way flying feels on your character. Please hover your cursor over each parameter in order to learn more about it.
▶ Read full flying setup documentation here.
Step 2 - Ensuring Animation Blueprint is Correct
When you retargeted your animation blueprint in an earlier step you used a blueprint that was similar to your creature. If you used a purely land-based creature to base your animation blueprint on, you may need to redo the ABP to use the swimmer/flyer you are most closely replicating.
Step 3 - Editing CharData
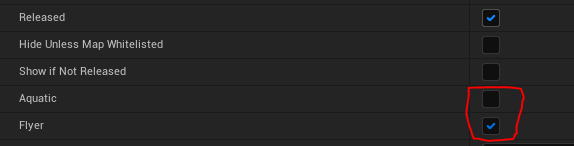
This checkbox determines whether your creature is playable on certain maps. Sometimes maps do not suit flyers or swimmers, such as a desert map with no water, or an indoor map with low ceilings, so please make sure these are accurate to your creature.
Ticking the "Aquatic" box will mean your creature is only playable on Aquatic compatible maps. Ticking the "Flyer" box will mean your creature is only playable on Flyer compatible maps.
- Open your CharData for your creature.
- Tick the box "Aquatic" or "Flyer"
TIP
If your creature can both swim and fly, only tick the "Flyer" box.
Step 4 - Spawn Points
You must set a "Start Tag" in your creature's blueprint in order for it to spawn in an appropriate location.
- Open your creature's blueprint.
- In "Player Start Tag" put one of the following:
Aquatic - Will spawn character in the water.
Amphibious - Will spawn character on the shore near oceans, lakes, or rivers.
Flyer - Will spawn character on high cliffs or plateaus which will require flying to get down from.
Land - Will spawn character on land.

Step 5 - Assign Quest Tags
Assign quest tags so your creature will be assigned relevant quests.
- Open your creature's blueprint.
- In "Quest Tags" put any combination of the following:
Aquatic - Will assign quests found in water
Amphibious - Will assign quests that require both land and water
Flyer - Will assign quests that are only reachable by flying
Generic - Will assign quests completeable on land.

Summary
If you follow all the above steps, you should have completed the following:
- Updated your creatures blueprint by enabling flying, swimming, quest tags, and start tags.
- Edited your CharData to check ON swimming or flying.
- Doublechecked your creatures animation blueprint.
Congrats! You can now move on to the next step. Back to tutorial.