Retargeting Animations
INFO
If you want to create your own custom animations, refer to our Animation List.
If you wish to use base-game dinosaur animations on your creature, we will need to retarget them onto your dinosaur’s skeleton. If done correctly, this means you won't have to animate your creature at all and makes it way easier to get your creature playable.
Step 1: Setting Up The Rig
First, look through our existing dinosaurs and find the one that best matches your new creature you want to implement. It is absolutely essential that you select a dinosaur that has similar proportions. For example, if you are looking to mod in a Tarbosaurus, you would likely want to use the Daspletosaurus animations for it instead of an unfitting dinosaur like Deinonychus or Struthiomimus.
- Once you have selected your dinosaur, you will need to open your creatures skeleton file “SKEL_DinoName”
- On the right side, click "Apply To Asset" on the Mesh section of your Skeleton to assign your mesh to your skeleton. This is essential or else you won't be able to retarget animations. If you don't see this option, the mesh is likely already applied.
- Select
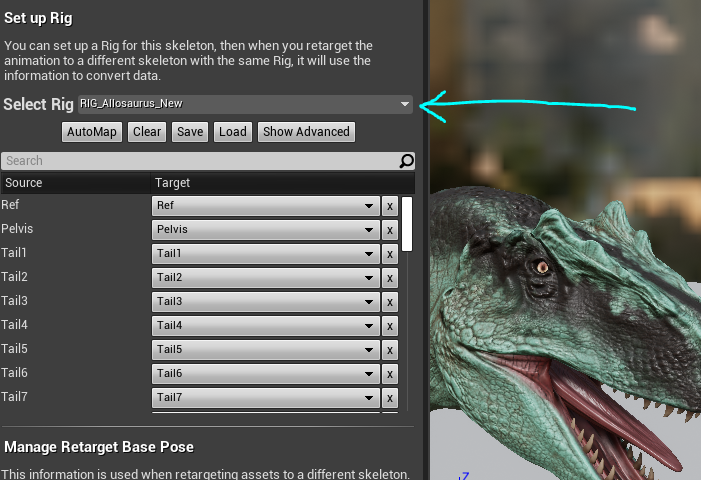
Window > Retarget Manager - Inside the Retarget Manager tab, Click the dropdown menu next to “Select Rig” and select the rig of the dinosaur you want to retarget animation from (for example, Daspletosaurus is SK_Daspleto_SkeletonRig)
- Double check that your target dinosaur is actually using this rig. Do this by opening up the Skeleton of that dinosaur and seeing if the rig is applied to it as well.
- After selecting the rig, you will notice that the area underneath is now populated with bone names. You must assign the bones that most closely relate to the corresponding bone on the dinosaur's skeleton. If you have used our skeleton from the previous step Rigging your Creatures to Our Skeleton you should be able to simply click “AutoMap” and the bones will automatically be mapped. If you are using your own custom skeleton, you will need to look through each bone and determine if they are accurate.
- Be sure to look through all bones and confirm they are associated correctly (pay close attention to finger and toe bones, they can sometimes get mixed up).
Step 2: Changing Retargeting Options
You may notice that your creature using the animations looks very different, and somewhat stumpy or longer than the original model you made. This is because the retargeting settings need to be tweaked.
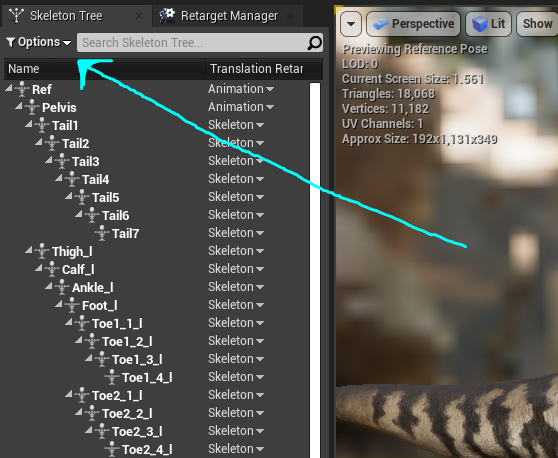
- With an animation open, click the “Options” drop down menu from the top left of the window, and select “Show Retargeting Options”.
- Select all bones except the Ref and Pelvis bones, right click, and select “Recursively Set Translation Retargeting Skeleton”
- The Ref and Pelvis bones should have the "Animation" option applied.
- Your dinosaur should now have the correct proportions. You can edit these retargeting methods and play around with these settings to further change the way the animations are applied to your creature.
Step 3: Retargeting Animations
Now that we have assigned your skeleton to the rig, we can retarget the entire Animation Blueprint to your new creature.
- First, create a new folder within your creatures mod folder named “Animations”
- Locate an animation of the dinosaur that most closely resembles your skeleton. This will be named “AS_DinoName_AnimationName” and found within that dinosaur’s "Animations" folder.
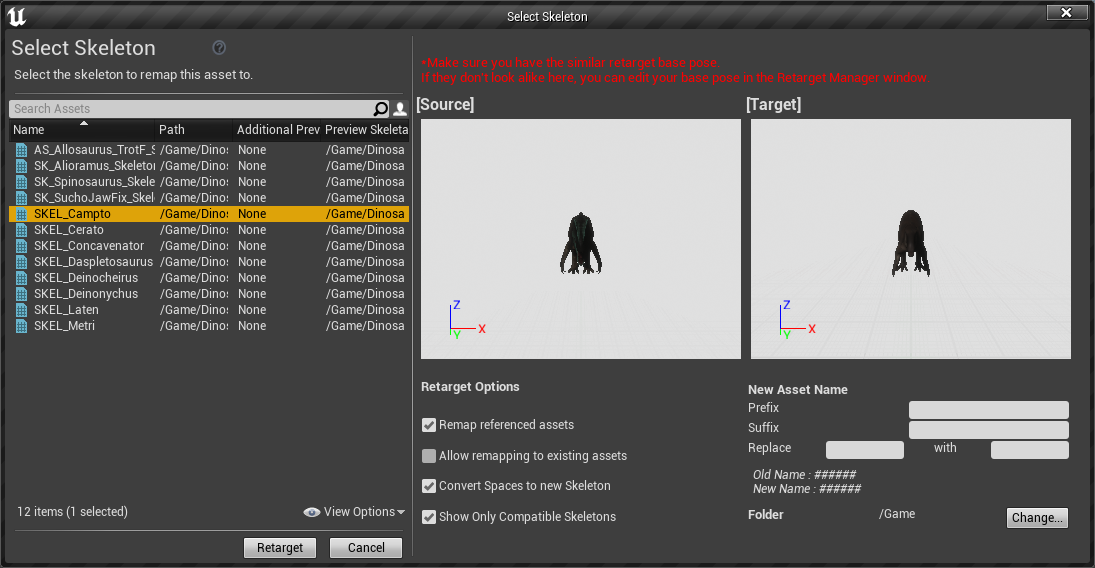
- Right click on the animation and select
Retarget Anim Assets > Duplicate Anim Blueprints and Retarget - The “Select Skeleton” window will appear. Select the skeleton of your creature from the left-hand panel and click the “Change…” button on the bottom right of the window to change the location the animation will be saved to.
- Select the “Animation” folder found within your creature’s mod folder, and click OK
- Then, select the “Retarget” button to begin the retargeting process.
Once the animation has been retargeted, open your mod creatures Animation folder and take a look at your resulting animation by double clicking it and observing its movements. Ensure that all bones are correctly aligned and moving, paying close attention to the toes and fingers.
TIP
Making Tweaks to Animations
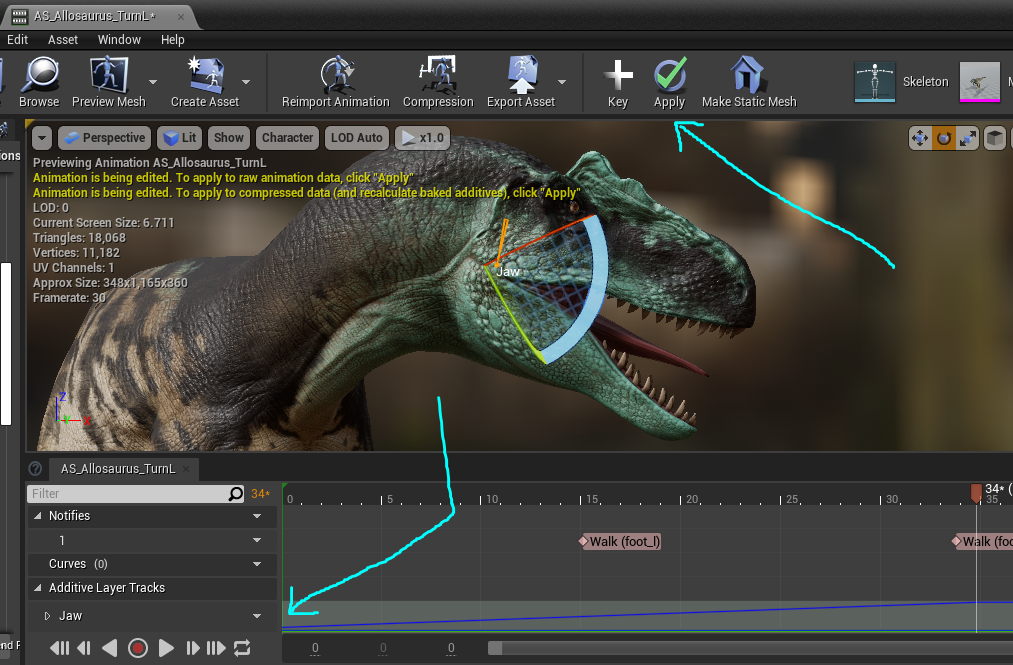
In many cases, once you retarget the animation there will be certain things that don't line up perfectly, like the jaw or arms. You can fix this in Unreal Engine without having to export the animation.
- Open the animation and select the bone you want to modify.
- Rotate the bone to the desired angle.
- Click the "Key" button at the top of the window, and then "Apply". The animation will now be updated to keep the bone with that rotation.
- If you make a mistake when keying a bone, you can delete the edits by selecting the "Additive Layer Tracks" for that bone and deleting it.
Summary
If you have followed this tutorial, you should now have:
- your skeleton assigned to a base game dinosaur's rig
- an animation that's been retargeted from a base game dino to your custom creature
Congrats! You can now move on to the next step. Back to tutorial.